
In today’s enterprise environment, there’s an increasing need to provide controlled, purpose-built computing experiences for specific user scenarios. That’s where Multi-App Kiosk Mode, also called the Restricted User Experience, comes in. This mode allows users to access a predefined set of applications in a controlled desktop environment, minimizing distractions and enhancing security.
In this article, we’ll explore how to set up Multi-App Kiosk Mode using a custom Assigned Access XML schema configuration policy deployed through Microsoft Intune. I’ll tailor the guide around a specific custom XML example that includes a mix of UWP and Win32 apps, file explorer restrictions, and a pinned Start menu.
Understanding Multi App Kiosk Mode and Restricted User Experience:
Multi-App Kiosk Mode transforms a Windows 11 device into a restricted environment where users can only run approved applications. Unlike single-app kiosks, which limit the device to one full-screen app, this mode presents a familiar Windows desktop with a customized Start menu, taskbar, and app list. It’s enforced via AppLocker rules and policy settings, ensuring users can’t access unauthorized features or settings.
Key benefits include:
- Enhanced Security: Prevents accidental or malicious changes to the device.
- User Productivity: Allows access to multiple tools (e.g., browsers, media players, and utilities) without full system freedom.
- Flexibility: Ideal for shared scenarios like retail kiosks, student devices, or corporate labs.
Prerequisites and Environment Setup:
Before implementing your Multi App Kiosk configuration, ensure you have the following prerequisites in place:
System Requirements:
- Windows Edition: Windows 11 Pro, Enterprise, or Education (version 22H2 or later recommended)
- Microsoft Intune: Active subscription with device enrollment capabilities
- Azure AD: Devices must be Azure AD joined or Hybrid Azure AD joined
- Administrative Access: Global Administrator or Intune Service Administrator role.
Preparing Your Environment:
First, verify that your target devices are properly enrolled in Intune. Navigate to the Microsoft Intune admin center and confirm that your devices appear under Devices > Windows > Windows devices.
Ensure that the applications you plan to include in your kiosk configuration are already installed on the target devices. This is crucial because the Assigned Access configuration doesn’t install applications; it only controls access to existing ones.
Deep Dive into the XML Configuration Structure:
The Assigned Access XML schema provides a structured way to define your kiosk configuration. Here’s the custom XML we’ll use as our example. It configures a kiosk for a “HCMGR Kiosk” user, allowing essential apps like Calculator, Settings, 7-Zip, VLC, Chrome, Edge, PowerShell, and File Explorer. It restricts File Explorer to the Downloads folder and removable drives, pins apps to the Start menu via JSON, and shows the taskbar.
<?xml version="1.0" encoding="utf-8"?>
<AssignedAccessConfiguration xmlns:xs="http://www.w3.org/2001/XMLSchema"
xmlns="http://schemas.microsoft.com/AssignedAccess/2017/config"
xmlns:rs5="http://schemas.microsoft.com/AssignedAccess/201810/config"
xmlns:v3="http://schemas.microsoft.com/AssignedAccess/2020/config"
xmlns:v5="http://schemas.microsoft.com/AssignedAccess/2022/config">

  <Profiles>
    <Profile Id="{9A2A490F-10F6-4764-974A-43B19E722C23}">
      <AllAppsList>
        <AllowedApps>
          <!-- UWP apps -->
          <App AppUserModelId="Microsoft.WindowsCalculator_8wekyb3d8bbwe!App" />
          <App AppUserModelId="windows.immersivecontrolpanel_cw5n1h2txyewy!microsoft.windows.immersivecontrolpanel" />

          <!-- Win32 apps (use DesktopAppPath, not AppUserModelId) -->
          <App DesktopAppPath="%ProgramFiles%\7-Zip\7zFM.exe" />
          <App DesktopAppPath="%ProgramFiles(x86)%\VideoLAN\VLC\vlc.exe" />
          <App DesktopAppPath="%ProgramFiles%\Google\Chrome\Application\chrome.exe" />
          <App DesktopAppPath="%ProgramFiles(x86)%\Microsoft\Edge\Application\msedge.exe" />
          <App DesktopAppPath="%windir%\System32\WindowsPowerShell\v1.0\powershell.exe" />
          <App DesktopAppPath="%windir%\explorer.exe" />
        </AllowedApps>
      </AllAppsList>

      <rs5:FileExplorerNamespaceRestrictions>
        <rs5:AllowedNamespace Name="Downloads" />
        <v3:AllowRemovableDrives />
      </rs5:FileExplorerNamespaceRestrictions>

      <!-- Pinned Start Menu (use desktopAppLink for Win32 shortcuts, packagedAppId for UWP) -->
      <v5:StartPins><![CDATA[{
        "pinnedList":[
          {"packagedAppId":"Microsoft.WindowsCalculator_8wekyb3d8bbwe!App"},
          {"packagedAppId":"windows.immersivecontrolpanel_cw5n1h2txyewy!microsoft.windows.immersivecontrolpanel"},
          {"desktopAppLink":"%ProgramData%\\Microsoft\\Windows\\Start Menu\\Programs\\7-Zip\\7-Zip File Manager.lnk"},
          {"desktopAppLink":"%ProgramData%\\Microsoft\\Windows\\Start Menu\\Programs\\VideoLAN\\VLC\\VLC media player.lnk"},
          {"desktopAppLink":"%ProgramData%\\Microsoft\\Windows\\Start Menu\\Programs\\Google Chrome.lnk"},
          {"desktopAppLink":"%ALLUSERSPROFILE%\\Microsoft\\Windows\\Start Menu\\Programs\\Microsoft Edge.lnk"},
          {"desktopAppLink":"%APPDATA%\\Microsoft\\Windows\\Start Menu\\Programs\\Windows PowerShell\\Windows PowerShell.lnk"},
          {"desktopAppLink":"%APPDATA%\\Microsoft\\Windows\\Start Menu\\Programs\\File Explorer.lnk"}
        ]
      }]]></v5:StartPins>

      <Taskbar ShowTaskbar="true" />
    </Profile>
  </Profiles>

  <Configs>
    <Config>
      <AutoLogonAccount rs5:DisplayName="HCMGR Kiosk" />
      <DefaultProfile Id="{9A2A490F-10F6-4764-974A-43B19E722C23}" />
    </Config>
  </Configs>
</AssignedAccessConfiguration>
XML Schema Declaration:
<?xml version="1.0" encoding="utf-8"?>
<AssignedAccessConfiguration xmlns:xs="http://www.w3.org/2001/XMLSchema"
xmlns="http://schemas.microsoft.com/AssignedAccess/2017/config"
xmlns:rs5="http://schemas.microsoft.com/AssignedAccess/201810/config"
xmlns:v3="http://schemas.microsoft.com/AssignedAccess/2020/config"
xmlns:v5="http://schemas.microsoft.com/AssignedAccess/2022/config">
These namespace declarations are essential as they define which version features you can use in your configuration. The v5 namespace, for instance, enables the latest Start menu pinning capabilities introduced in Windows 11.
The Profile section defines what applications and features are available in the kiosk mode:
<Profile Id="{fc192d3c-c510-4600-a2ab-4d1b740ae566}"> Each profile requires a unique GUID identifier. You can generate this using PowerShell with the command
[guid]::NewGuid()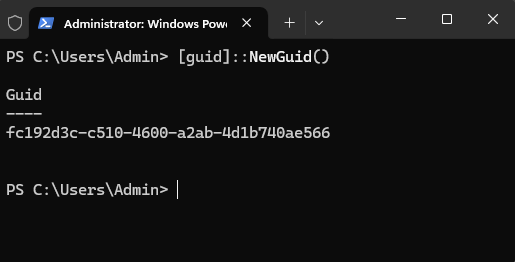
Application Whitelisting:
The AllowedApps section is where you define which applications users can access. Our configuration includes both UWP (Universal Windows Platform) and Win32 applications:
UWP Applications use the AppUserModelId (AUMID):
- Windows Calculator: Microsoft.WindowsCalculator_8wekyb3d8bbwe!App
- Settings App: windows.immersivecontrolpanel_cw5n1h2txyewy!microsoft.windows.immersivecontrolpanel
Follow the instructions listed here to retrieve AUMIDs.
Win32 Applications use the DesktopAppPath:
- 7-Zip File Manager: %ProgramFiles%\7-Zip\7zFM.exe
- VLC Media Player: %ProgramFiles(x86)%\VideoLAN\VLC\vlc.exe
- Google Chrome: %ProgramFiles%\Google\Chrome\Application\chrome.exe
- Microsoft Edge: %ProgramFiles(x86)%\Microsoft\Edge\Application\msedge.exe
- PowerShell: %windir%\System32\WindowsPowerShell\v1.0\powershell.exe
- File Explorer: %windir%\explorer.exe
File System Restrictions:
The FileExplorerNamespaceRestrictions element controls what parts of the file system users can access:
<rs5:FileExplorerNamespaceRestrictions>
<rs5:AllowedNamespace Name="Downloads" />
<v3:AllowRemovableDrives />
</rs5:FileExplorerNamespaceRestrictions>
This configuration allows access to the Downloads folder and removable drives while restricting access to other system locations.
Start Menu Customization:
The Start menu layout is defined using JSON within a CDATA section:
<v5:StartPins><![CDATA[{
"pinnedList":[
{"packagedAppId":"Microsoft.WindowsCalculator_8wekyb3d8bbwe!App"},
{"desktopAppLink":"%ProgramData%\\Microsoft\\Windows\\Start Menu\\Programs\\7-Zip\\7-Zip File Manager.lnk"} // Additional apps... ] }]]>
</v5:StartPins>
This creates a customized Start menu showing only the specified applications in the order defined.
Step-by-Step Deployment Guide
Step 1: Prepare the XML Configuration File
Save your XML configuration to a file named KioskConfiguration.xml. Ensure the file is properly formatted and validates against the Assigned Access schema.
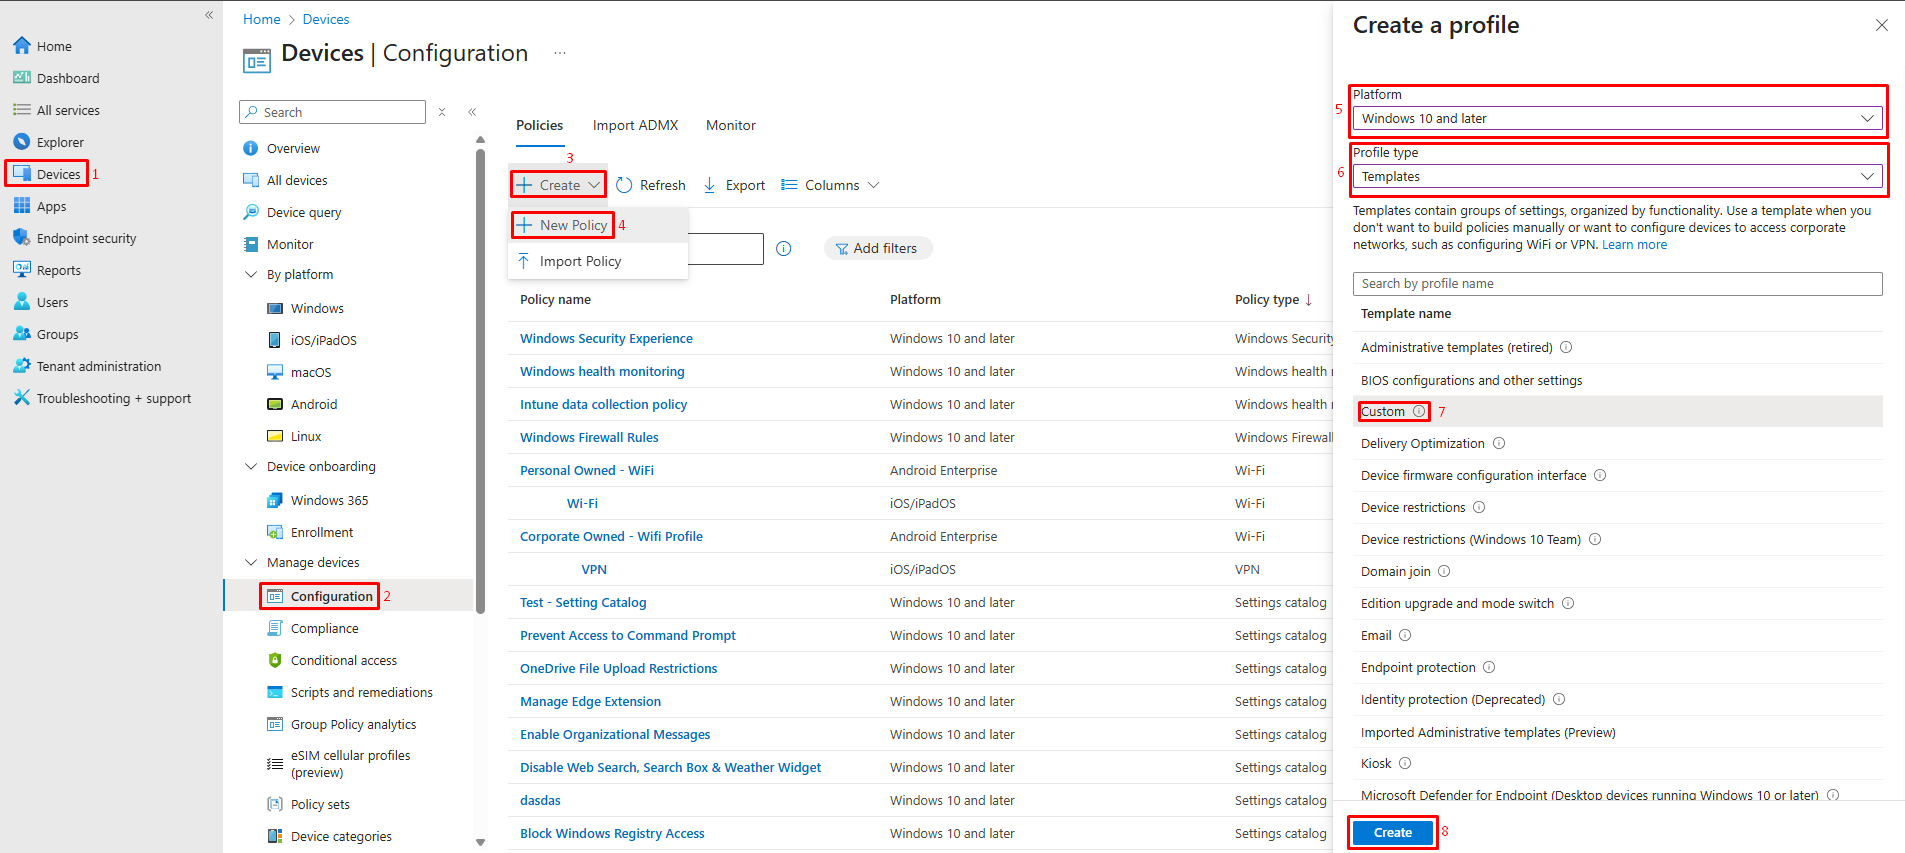
Step 2: Create the Configuration Profile in Intune
- Sign in to the Microsoft Intune admin center
- Navigate to Devices > Configuration profiles > Create profile
- Select the following options:
-
- Platform: Windows 10 and later
- Profile type: Templates
- Template name: Custom
- Click Create
Step 3: Configure the Custom OMA-URI Settings
- In the Basics tab, provide:
-
- Name: “Multi App Kiosk Configuration – HCMGR”
- Description: “Restricted user experience with access to essential applications”
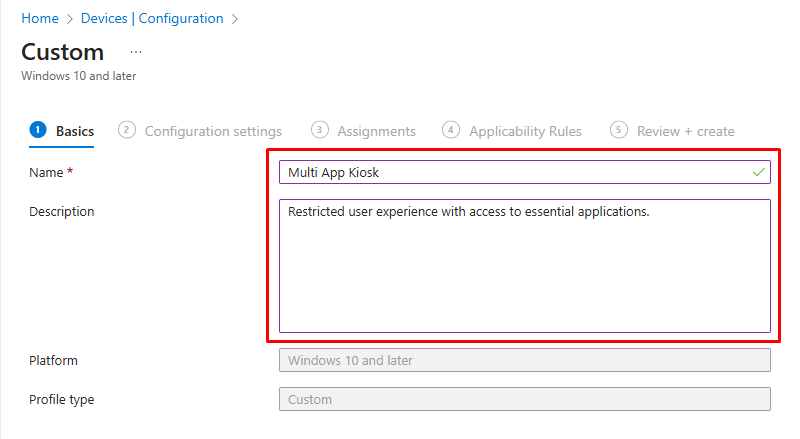
- Click Next to proceed to Configuration settings
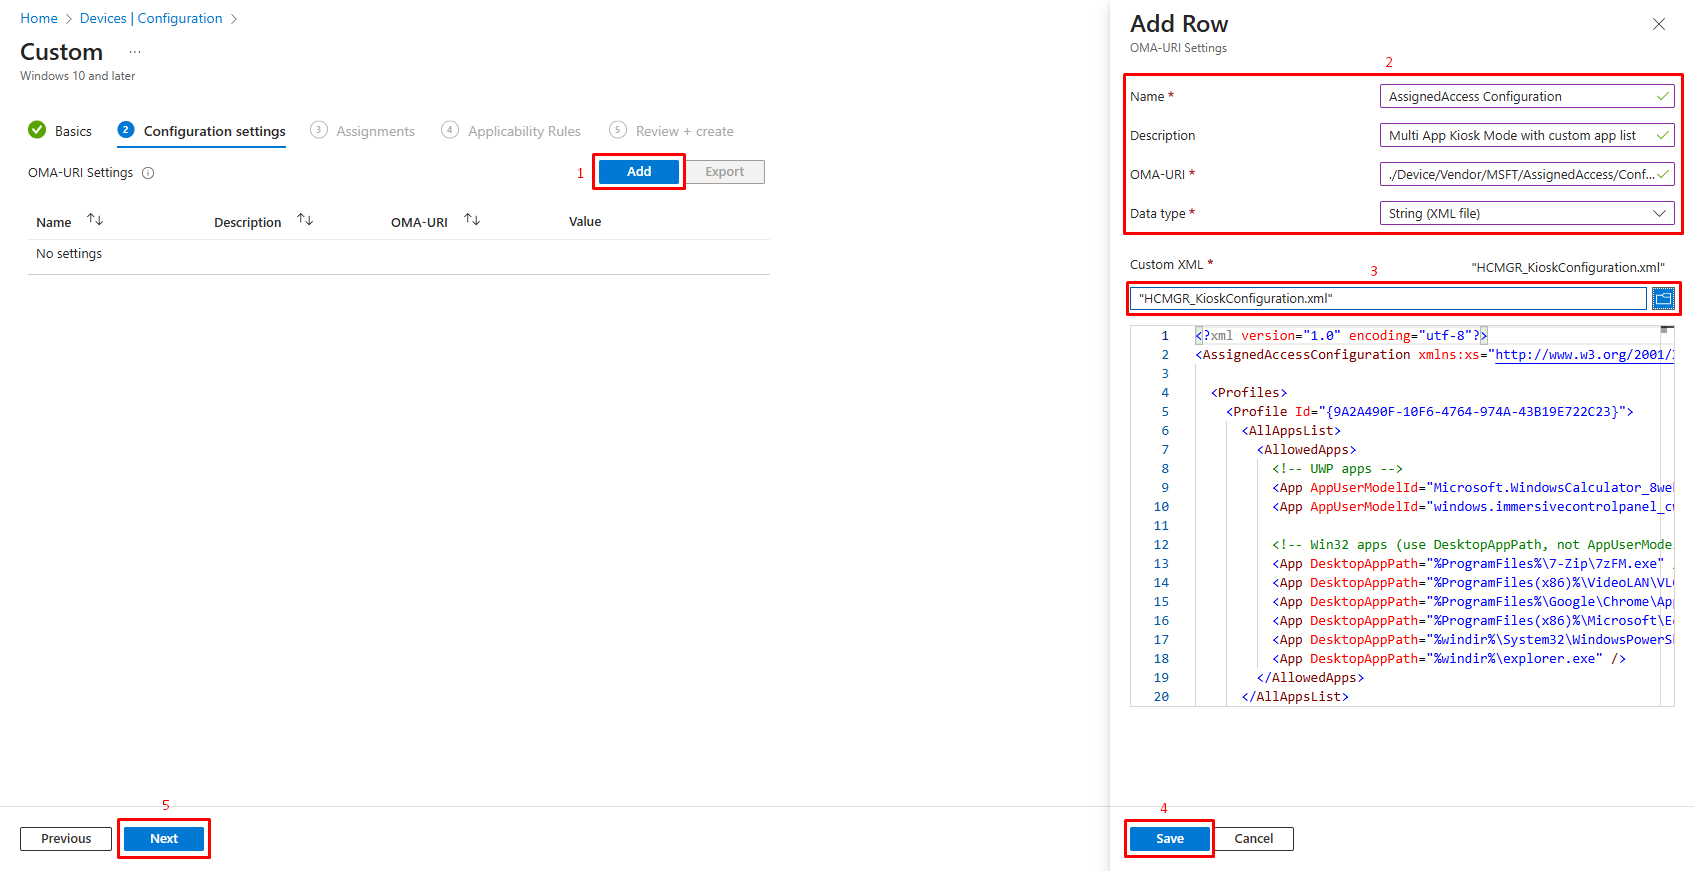
- Click Add to create a new OMA-URI setting:
-
- Name: “AssignedAccess Configuration”
- Description: “Multi App Kiosk Mode with custom app list”
- OMA-URI: ./Device/Vendor/MSFT/AssignedAccess/Configuration
- Data type: String (XML)
- Value: Upload your custom XML configuration file
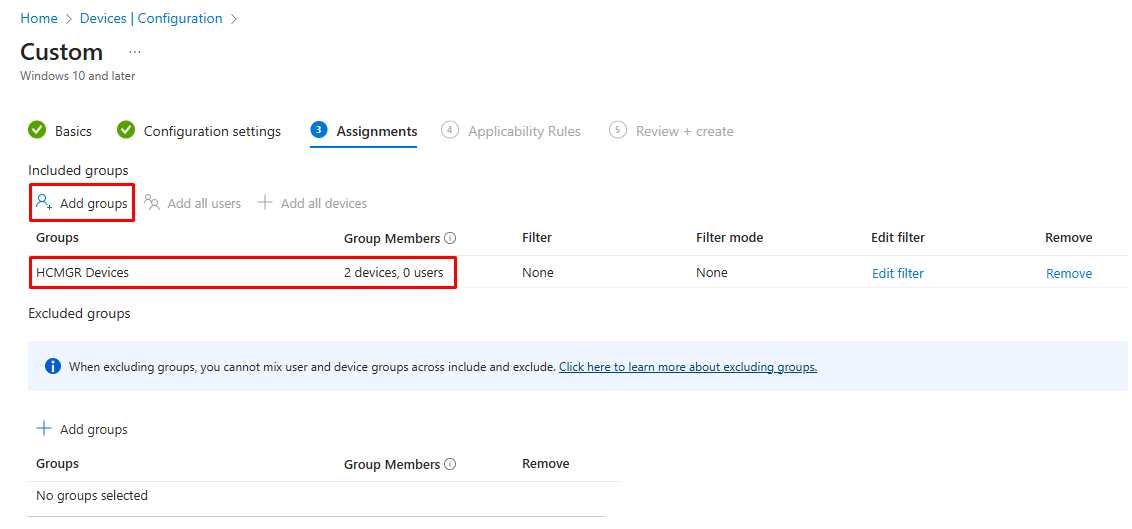
Step 4: Assign the Profile
- In the Assignments tab, click Add groups
- Select the appropriate options:
For testing: Choose a pilot group containing test devices
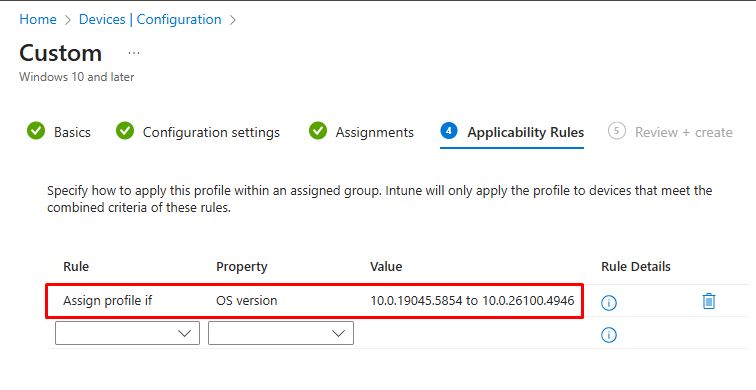
Step 5: Define Applicability Rules
- Rule: Assign Profile If
- Property: OS Version
- Value: Enter Valid Window OS Version as per your target devices.
Step 6: Review and Create
- Review all settings in the Review + create tab
- Verify that the configuration appears correct
- Click Create to deploy the profile

Monitoring and Troubleshooting:
Monitoring Deployment Status
After creating the configuration profile, monitor its deployment:
- Navigate to Devices > Configuration profiles
- Select your kiosk configuration profile
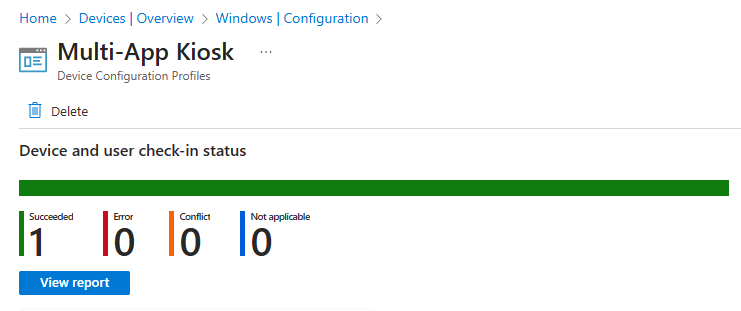
- View the Device status and User status reports
- Check for any devices showing errors or pending status
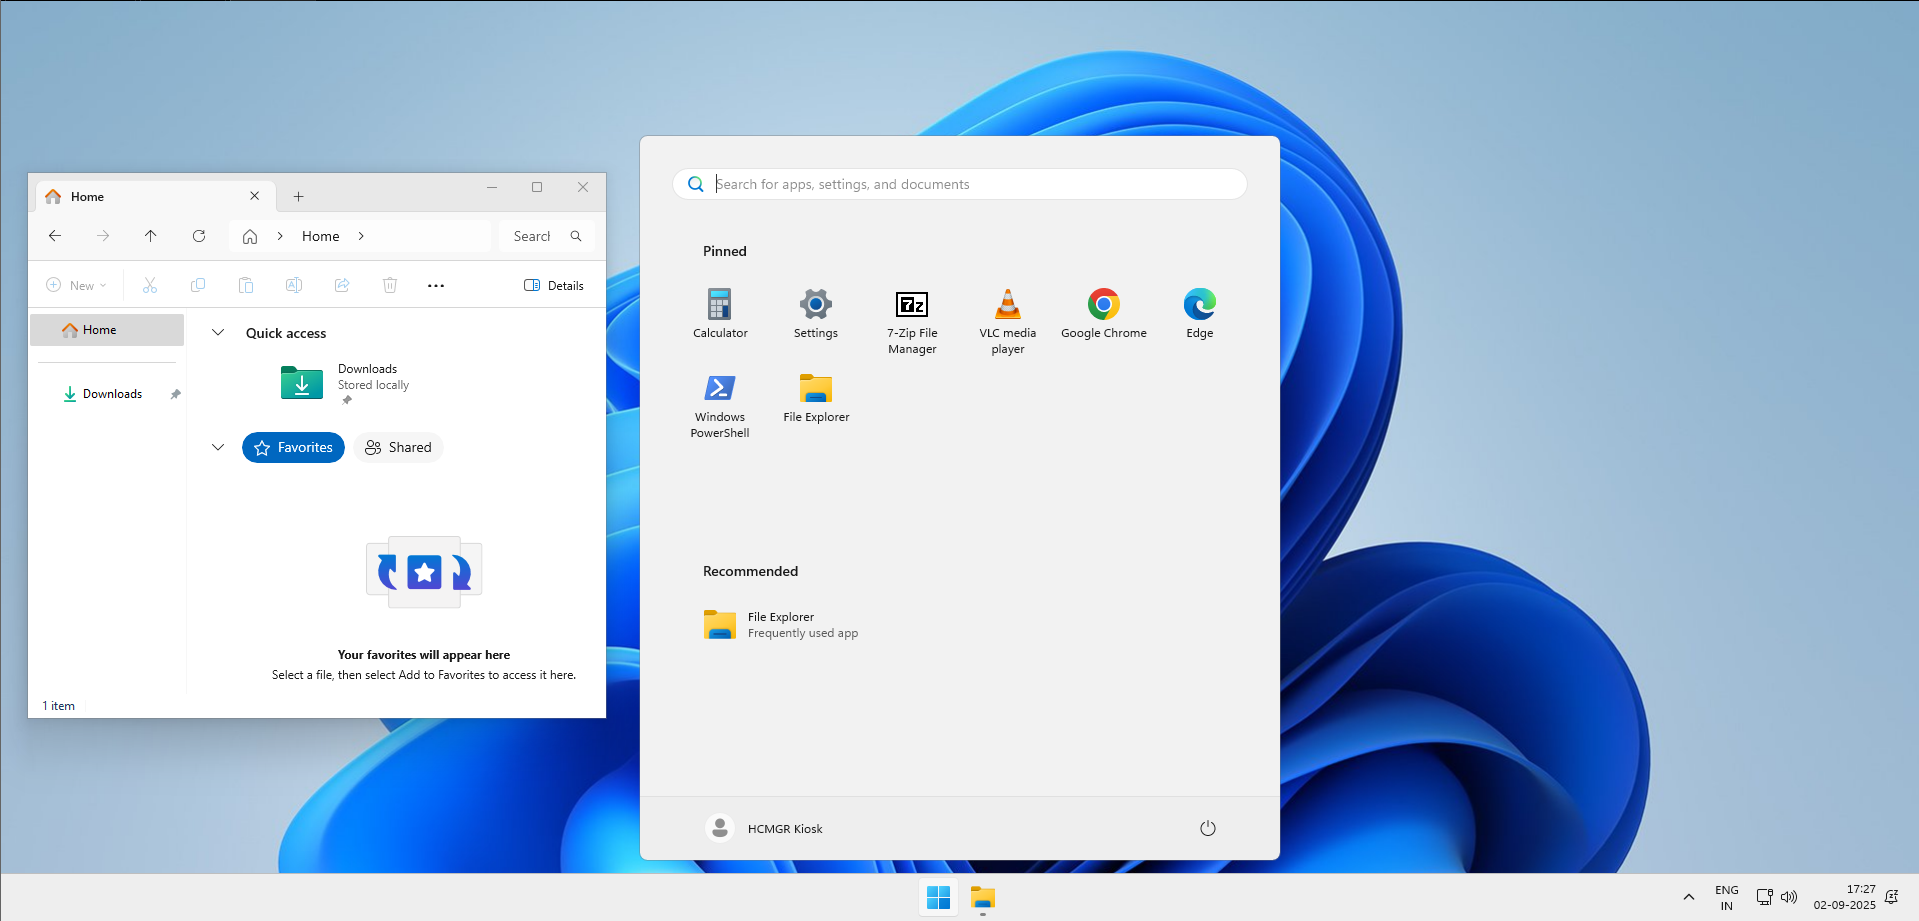
User Experience:
Common Issues and Solutions
Issue: Applications not appearing in the kiosk
Solution: Verify that applications are installed before the kiosk profile is applied. Consider creating a required apps policy in Intune to ensure proper sequencing.
Issue: User cannot access File Explorer despite configuration
Solution: Ensure the Explorer.exe path is correct and that File Explorer namespace restrictions are properly configured. The AllowRemovableDrives setting requires the v3 namespace.
Issue: Start menu shows default layout instead of custom pins
Solution: Verify that the JSON structure in the StartPins section is valid and that shortcut paths match exactly what’s on the device. Use environment variables consistently.
Testing and Validation Checklist
Before deploying to production, complete this validation checklist:
- Test automatic sign-in functionality
- Verify all whitelisted applications launch correctly
- Confirm File Explorer restrictions are enforced
- Test Start menu customization appears as expected
- Validate that non-whitelisted applications cannot be accessed
- Check taskbar functionality and appearance
- Test removable drive access if configured
- Verify users cannot access system settings beyond what’s allowed
- Confirm the kiosk experience persists after reboot
- Test the user experience from a non-administrative perspective
Conclusion
With this custom Assigned Access XML and Intune deployment method, you can deliver a controlled, secure multi-app kiosk environment. This approach is flexible, allowing you to mix UWP apps and traditional Win32 applications while still enforcing restrictions through AppLocker and Explorer rules.


This is very good artical, i will refer to my friend