OneNote add-ins extend application functionality but can introduce security vulnerabilities and compliance risks when users install unauthorized extensions. Many organizations struggle to balance enabling legitimate productivity tools while preventing potentially harmful or non-compliant add-ins from running on corporate devices.
Microsoft Intune provides IT administrators with granular control over OneNote add-in behavior through a two-policy system. By combining the “Block all unmanaged add-ins” policy with the “List of managed add-ins” policy, organizations can enforce a whitelist approach where only approved add-ins function, while all others are automatically blocked.
This technical guide walks through implementing these complementary policies to create a secure OneNote environment across your enterprise.
Understanding OneNote Add-in Management Policies
OneNote add-in management operates through two interdependent policies that work together to control add-in behavior:
The “Block All Unmanaged Add-ins” Policy
This foundational policy acts as an on/off switch for restricting unauthorized add-ins. When enabled, it prevents any add-in not explicitly listed in the managed add-ins policy from running. This policy alone does nothing without the accompanying managed add-ins list – it requires the second policy to be meaningful.
The “List of Managed Add-ins” Policy
This policy creates a registry of approved add-ins with three possible states for each add-in:
- State 0 (Always Disabled/Blocked): The add-in is explicitly forbidden from running
- State 1 (Always Enabled): The add-in automatically runs and users cannot disable it
- State 2 (Configurable by User): The add-in is allowed to run if the user enables it, but the “Block all unmanaged add-ins” policy does not force it off
Together, these policies enable a whitelist security model where only approved add-ins function on corporate devices.
Policy Behavior Reference
Understanding how these policies interact is critical for proper implementation:
Scenario 1: Both policies enabled, add-in in managed list as State 1
- Result: Add-in runs automatically; users cannot disable it
Scenario 2: Both policies enabled, add-in in managed list as State 2
- Result: Add-in is allowed but optional; users control whether it runs
Scenario 3: Both policies enabled, add-in NOT in managed list
- Result: Add-in is blocked completely; users cannot enable it
Scenario 4: “Block all unmanaged” enabled, “Managed list” disabled or empty
- Result: ALL add-ins are blocked
Scenario 5: “Block all unmanaged” disabled, “Managed list” enabled
- Result: Managed list has no effect; users can freely install any add-in
Scenario 6: Both policies disabled or not configured
- Result: Users have complete freedom to enable or disable any add-in
Prerequisites and Planning
Before implementing these policies, ensure your organization meets these requirements:
- Access to Microsoft Intune Admin Center with device configuration permissions
- Target devices running Windows 10 (version 1909 or later) or Windows 11
- OneNote installed on target devices (Microsoft 365 version or standalone)
- Devices already enrolled in Intune’s mobile device management
- Azure Active Directory security groups created for policy assignment
- Inventory of approved OneNote add-ins with their Programmatic Identifiers (ProgIDs)
Obtaining Add-in ProgIDs
The ProgID is a unique identifier for each OneNote add-in, required for the managed add-ins policy. Obtain ProgIDs using these methods:
Method 1: Registry Editor (Direct from Device)
- On a device with the add-in installed, press Win + R
- Type regedit and press Enter
- Navigate to one of these locations (depending on installation scope):
HKEY_LOCAL_MACHINE\SOFTWARE\Microsoft\Office\OneNote\Addins (system-wide)
HKEY_CURRENT_USER\SOFTWARE\Microsoft\Office\OneNote\Addins (user-specific)
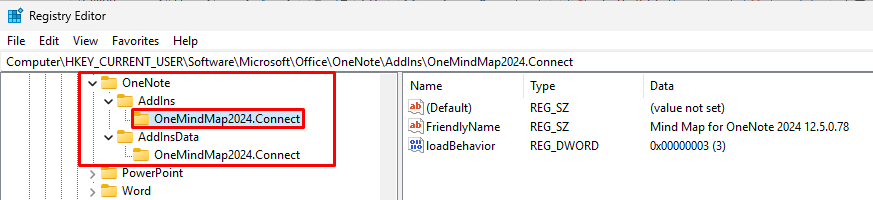
4. The folder names under “Addins” are the ProgIDs
5. Document each ProgID you find that should be approved.
Method 2: Office Telemetry Dashboard
- In your organization’s Office Telemetry Dashboard
- Navigate to the add-ins section
- Look for OneNote add-ins in the inventory
- ProgIDs are typically displayed in the telemetry data
- Export or document the ProgIDs of add-ins you want to manage
Method 3: Vendor Documentation
For commercial add-ins, the vendor often provides ProgID documentation in setup guides or knowledge base articles.
Creating the “Block All Unmanaged Add-ins” Configuration Policy
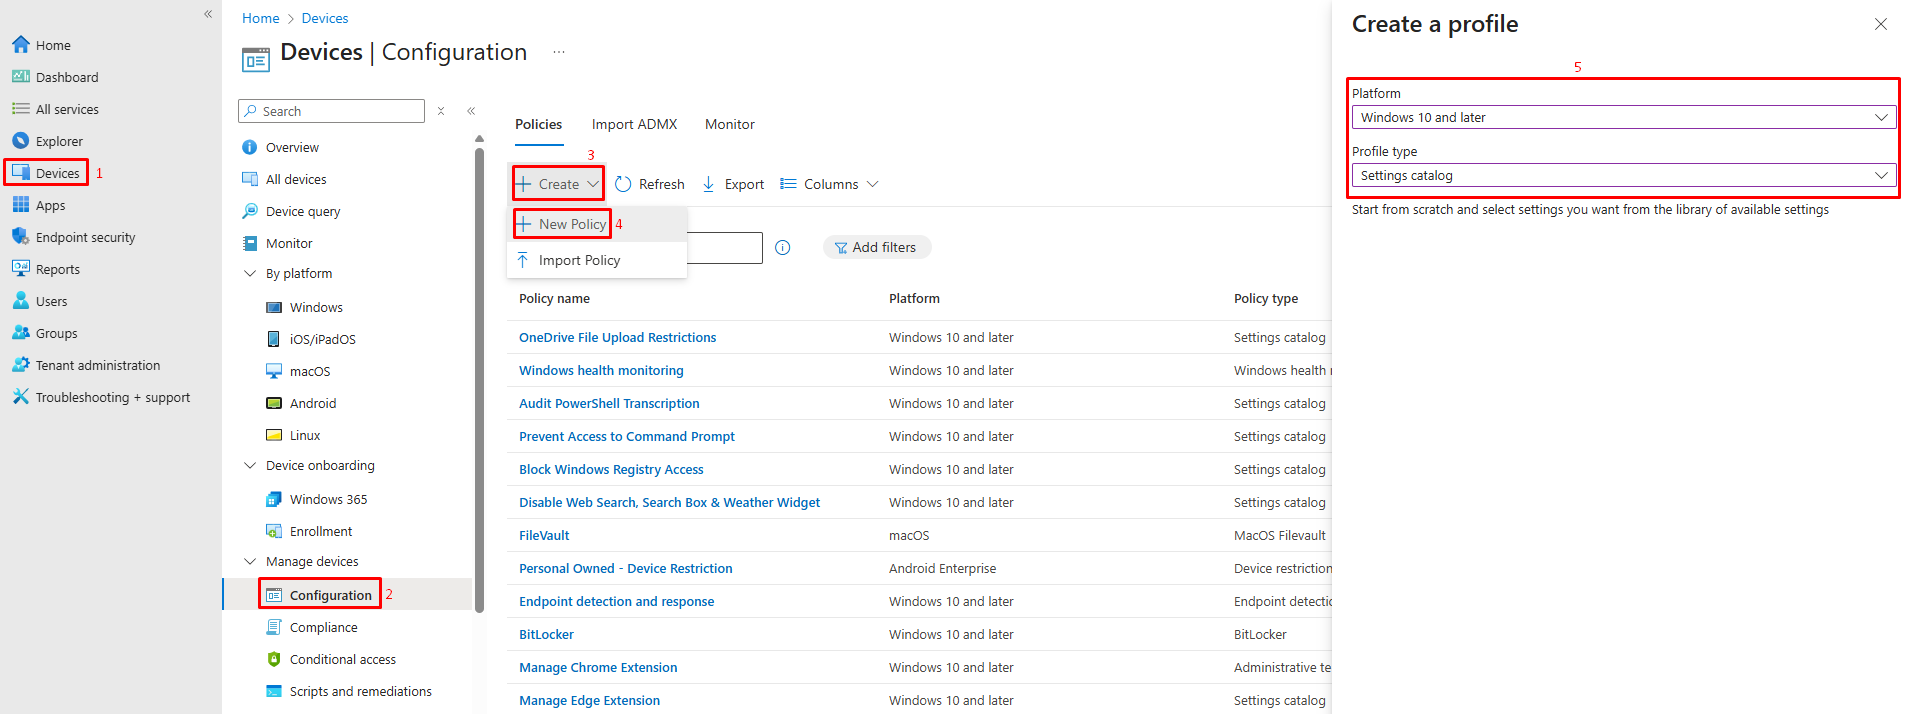
Step 1: Access Intune and Create a New Settings Catalog Policy
- Navigate to https://intune.microsoft.com/
- In the left navigation pane, select Devices
- Select Configuration
- Click + Create
- In the “Create a profile” window, configure:
- Platform: Windows 10 and later
- Profile type: Settings catalog
- Click Create
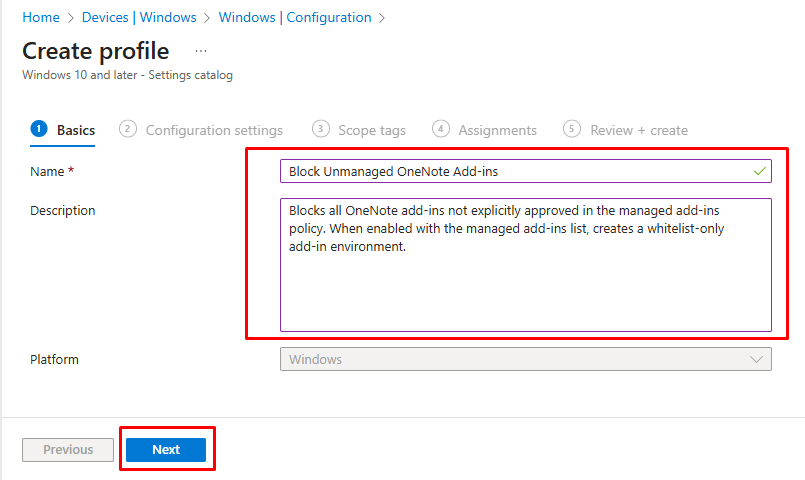
Step 2: Complete Basic Policy Information
- On the Basics tab, enter:
- Name:
Block Unmanaged OneNote Add-ins - Description:
Blocks all OneNote add-ins not explicitly approved in the managed add-ins policy. When enabled with the managed add-ins list, creates a whitelist-only add-in environment. - Verify Platform shows Windows 10 and later
- Name:
- Click Next
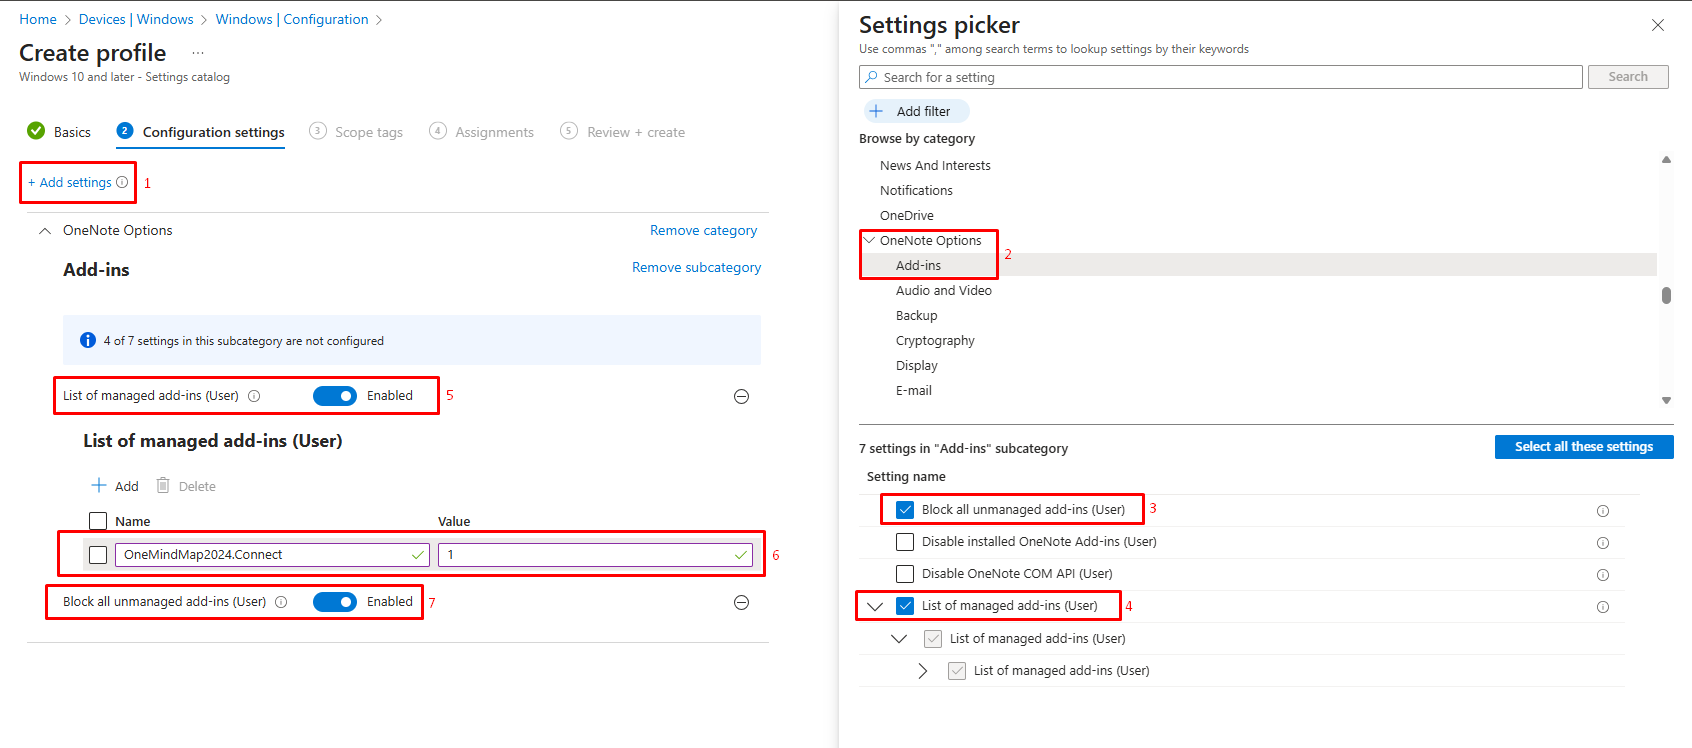
Step 3: Add the Policy Setting
- On the Configuration settings tab, click + Add settings
- The Settings Picker window opens
-
Search for the setting by typing:
Block all unmanaged add-ins - Alternatively, navigate using categories:
- OneNote Options → add-ins
- Select Block all unmanaged add-ins (User) & List of managed add-ins (User).
Step 4: Enable the Policy
- On the configuration screen, the toggle switch appears in disabled state by default
- Click the toggle to move it from left to right
- The toggle turns blue and displays Enabled
- This enabled state activates the unmanaged add-in blocking mechanism
Now you define the behavior for each approved add-in using ProgIDs and state values.
- On the managed add-ins configuration screen, you see a table or input area for adding add-ins
- For each add-in you want to manage, click + Add or the appropriate button to add a new entry
For each add-in entry, you provide: Value name field: Enter the exact ProgID (obtained from registry or telemetry)
- Example:
OneMindMap2024.Connect
-
- Value field: Enter the state number:
-
-
- 0 = Always blocked (add-in cannot run)
- 1 = Always enabled (add-in runs automatically, users cannot disable)
- 2 = Configurable by user (add-in can run if user enables it)
-
Important: Enabling this policy without also enabling the “List of managed add-ins” policy will block ALL add-ins.
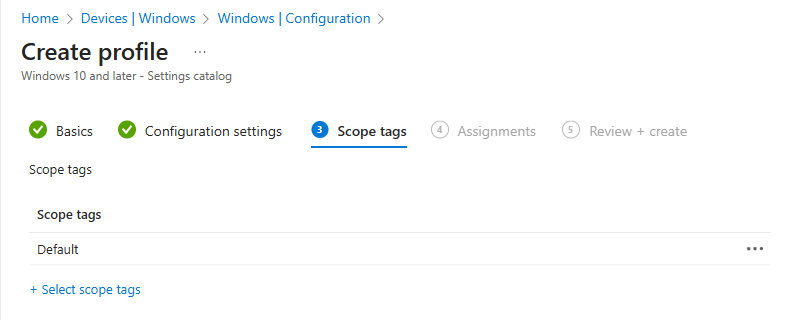
Step 5: Configure Scope Tags (Optional)
- On the Scope tags tab, decide if administrative role-based access control is needed
- Skip this step if not using scope tags (typical for most organizations)
- Click Next
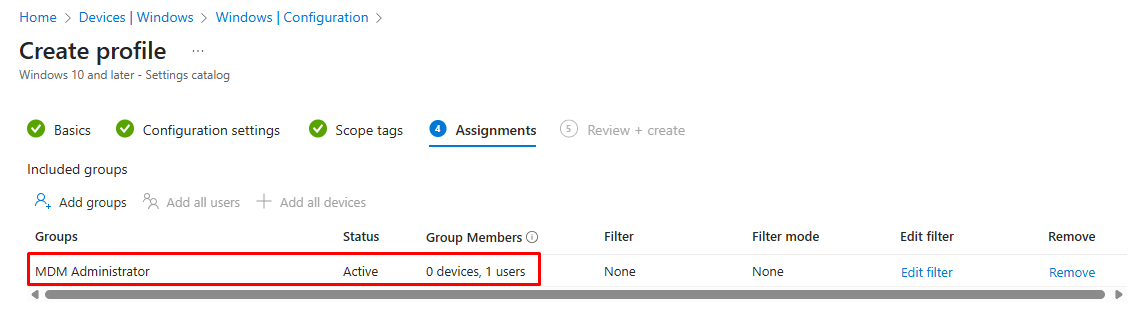
Step 6: Assign to Target User Groups
- On the Assignments tab, under Included groups, click + Add groups
- Select the Entra ID security user group(s) that should have add-ins blocked
- Click Select
- Click Next
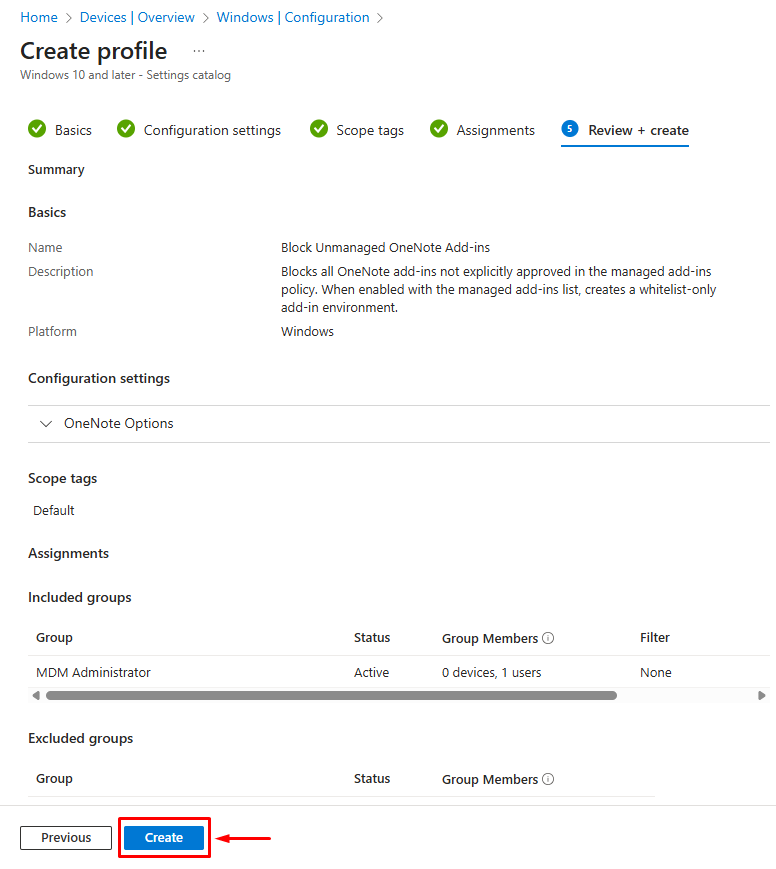
Step 7: Review and Create
- On the Review + create tab, verify all settings
- Confirm the policy is set to Enabled
- Check that correct groups are assigned
- Click Create
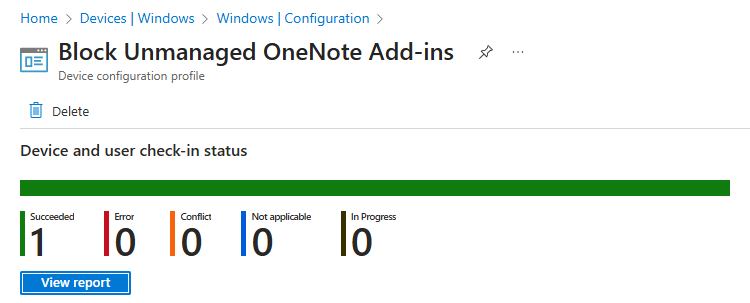
Monitoring Policy Deployment
Checking Intune Status
- Navigate to Devices → Configuration
- Search for your policies by name
- Click on the created policy to view deployment metrics:
-
- Total targeted devices
- Successful applications
- Pending or in-progress deployments
- Any failed deployments
Allow 15-30 minutes for initial synchronization.
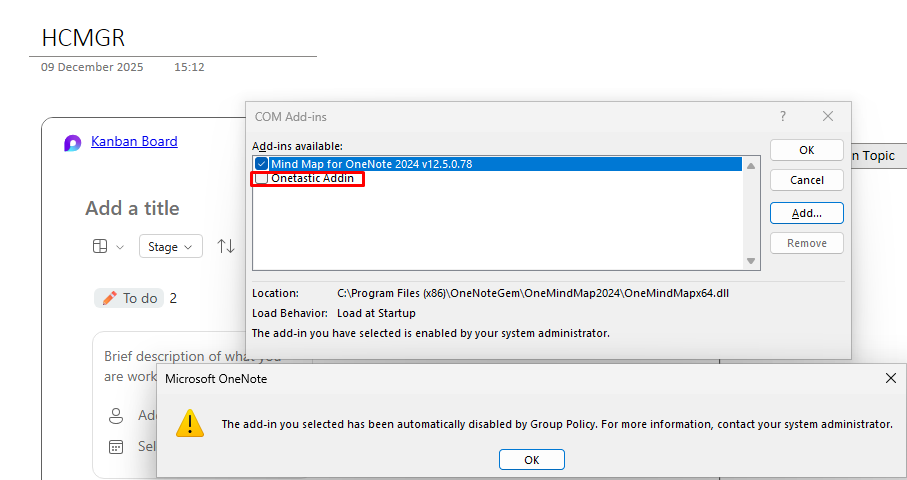
Policy in Action
Testing with Unauthorized Add-ins
- Attempt to install a new add-in that is NOT in your managed add-ins list
- The add-in may install, but it should not load in OneNote
- If user tries to enable it, OneNote should prevent activation due to the blocking policy
Troubleshooting Deployment Issues
All Add-ins Blocked (Including Approved Ones)
Cause: “Block all unmanaged” enabled without corresponding managed list enabled or with empty list
Solution: Verify “List of managed add-ins” policy is enabled and contains your approved add-in ProgIDs
Add-in Still Appears Blocked After Adding to Managed List
Cause: Policy not yet synced to device
Solution:
- On target device, open Settings → Accounts → Access work or school
- Click your work account → Info
- Click Sync button
- Wait 10-15 minutes for sync to complete
- Restart OneNote
ProgID Not Working (Add-in Still Blocked)
Cause: Incorrect ProgID spelling or format
Solution:
- Return to the device where the add-in is installed
- Double-check the ProgID in Registry Editor character-by-character
- Verify case sensitivity (ProgIDs are typically case-insensitive, but spelling must be exact)
- Update the managed add-ins policy with corrected ProgID
- Re-sync and test
Important Considerations
Registry Location Dependency: Add-ins may register in either HKEY_LOCAL_MACHINE or HKEY_CURRENT_USER depending on installation type. The ProgID remains the same, but verify you’re checking the correct registry location if an add-in doesn’t appear where expected.
OneNote Versions: This guidance applies to OneNote in Microsoft 365. OneNote 2016 and earlier versions use different management mechanisms and may not support these policies fully.
Office Installation Type: Click-to-Run (Microsoft 365) and MSI-based installations handle add-ins differently. Verify your organization’s OneNote installation type before deployment.
Timing of Policy Application: After policies deploy, users may need to restart OneNote or their devices for changes to take effect.
Third-Party Add-ins: Some commercial OneNote add-ins may require additional licensing or enrollment steps beyond these policies. Verify with add-in vendors before deployment.
Conclusion
Managing OneNote add-ins through Intune’s “Block all unmanaged add-ins” and “List of managed add-ins” policies provides enterprise organizations with a secure, controlled add-in environment. By implementing this two-policy system, you balance security requirements with user productivity, ensuring only approved extensions run while preventing unauthorized or potentially harmful add-ins from compromising your organization’s data and compliance posture.