
Progressive Web Apps (PWAs) have transformed how organizations deliver application experiences to their users. Unlike traditional desktop applications that require complex installation processes and frequent updates, PWAs offer a lightweight, cross-platform alternative that’s easier to maintain and deploy. For IT administrators managing Windows environments, Microsoft Intune provides a streamlined approach to deploying PWAs across your organization.
This guide will show you exactly how to deploy PWAs across your Windows environment using Intune’s Settings Catalog and Edge configuration policies. By the end, you’ll be able to push any PWA to your users’ devices with customized shortcuts, launch behaviors, and icons-all without packaging a single installer file.
What Are Progressive Web Apps?
Progressive Web Apps are web applications that leverage modern web technologies to deliver app-like experiences directly through a browser. However, they can also be installed as standalone applications on Windows devices, appearing in the Start menu and taskbar just like traditional desktop apps.
What makes PWAs attractive for enterprise deployment:
- Zero installation overhead – No executable files, MSI packages, or complex installers to manage
- Instant updates – Developers update the web app, and all users automatically get the latest version
- Minimal storage impact – Most PWAs consume only a few megabytes compared to hundreds for traditional apps
- Cross-platform consistency – The same PWA works identically across Windows, Mac, Linux, iOS, and Android
- Reduced security surface – Runs within the browser’s security sandbox with limited system access
- Lower TCO – Less time spent packaging, testing, and deploying application updates
Prerequisites for PWA Deployment via Intune
Before beginning your deployment, verify you have:
- Microsoft Intune subscription and administrative rights to create and assign Configuration Profiles
- Windows 10 version 1803 or later, or Windows 11 (enrolled in Intune)
- Microsoft Edge (Chromium version) installed on target devices (typically pre-installed on Windows 10/11)
- PWA URL – The web address you want to deploy as an app
- Basic JSON knowledge – Understanding how to structure the configuration (we’ll provide templates)
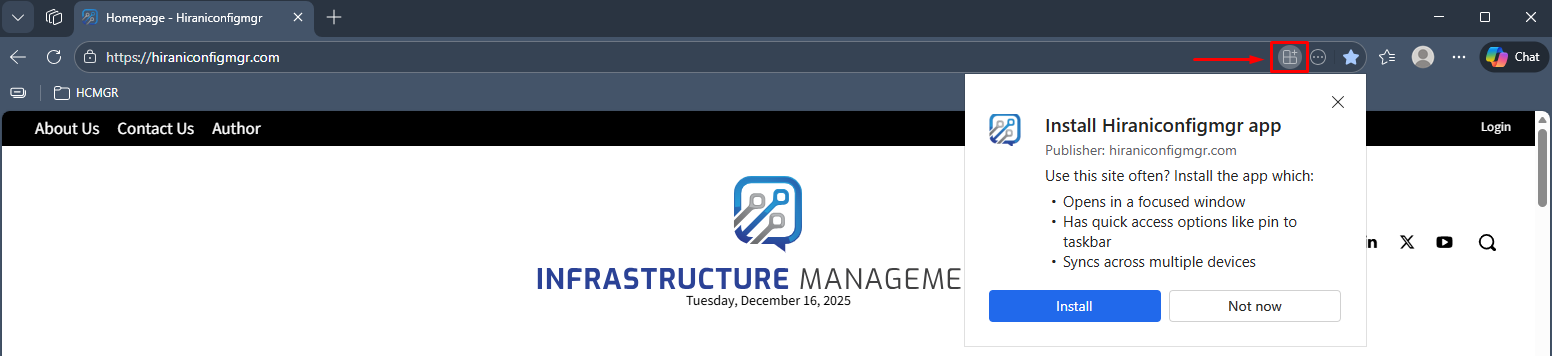
Important note: The target website must be a proper PWA with a web app manifest. Not all websites support PWA installation. You can verify a site is PWA-ready by visiting it in Edge and checking if an install option appears.
Step-by-Step: Deploying PWAs Through Edge Configuration Profiles
Step 1: Identify and Verify Your PWA
Before creating the Intune configuration, test the PWA manually:
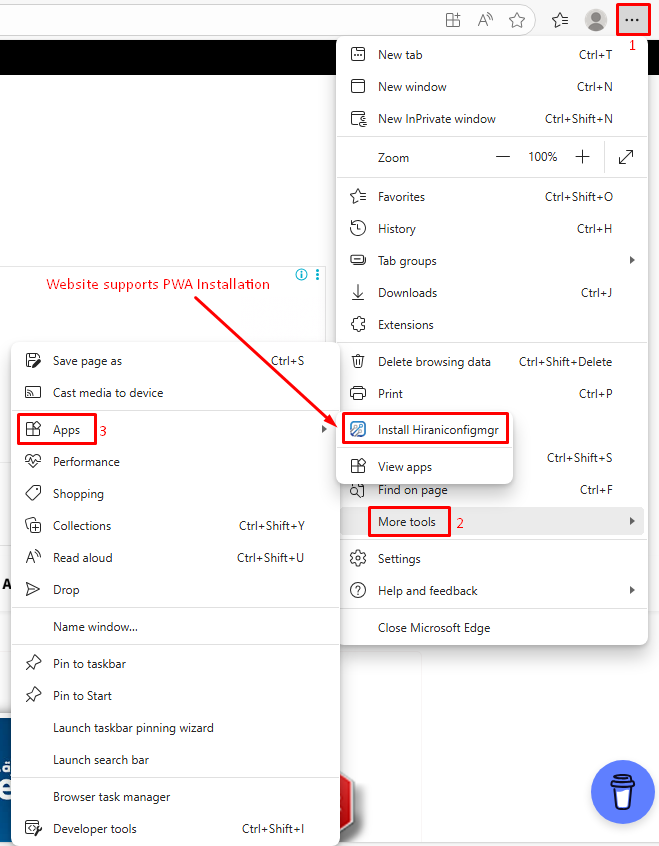
- Open Microsoft Edge and navigate to your target web application
- Click the three dots menu (⋯) in the upper right corner
- Navigate to Apps > Look for Install [AppName] or Install this site as an app
- If the option appears, the site is PWA-ready and can be deployed via Intune
Make note of:
- The exact URL that should be installed
- The app name you want users to see
- Whether you want desktop shortcuts created
- How the app should launch (standalone window vs browser tab)
Step 2: Access Microsoft Intune Admin Center
- Sign into the Microsoft Intune admin center at https://intune.microsoft.com
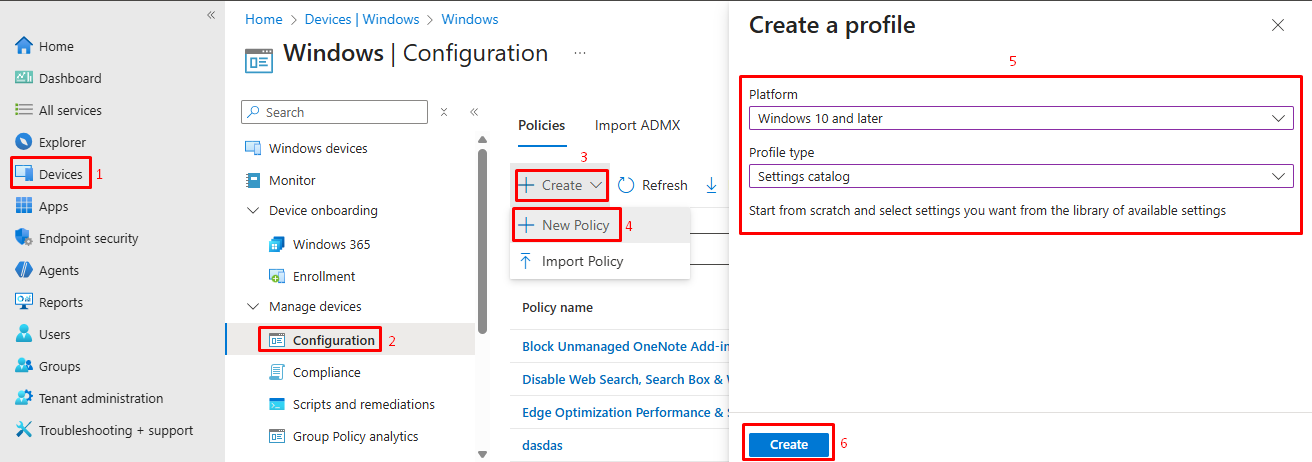
- From the left navigation, select Devices
- Click Configuration (formerly Configuration Profiles)
- Select Create > New Policy
- In the Platform dropdown, select Windows 10 and later
- For Profile type, choose Settings catalog
- Click Create to begin building your profile
Why Settings Catalog? This method gives you access to the latest Edge policies as soon as Microsoft releases them, without waiting for Intune UI updates.
Step 3: Configure Basic Profile Information
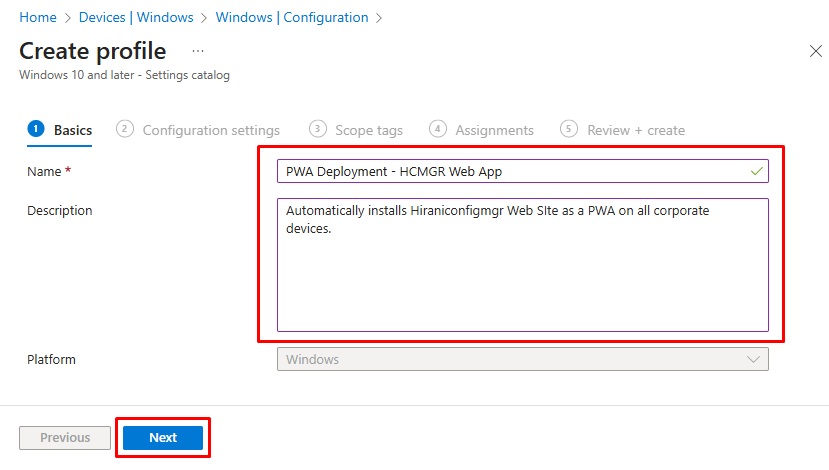
- Name: Enter a descriptive name like “
PWA Deployment - HCMGR Web App” - Description: Document what this profile does. Example: “
Automatically installs Hiraniconfigmgr Web SIte as a PWA on all corporate devices“ - Click Next to proceed to settings configuration
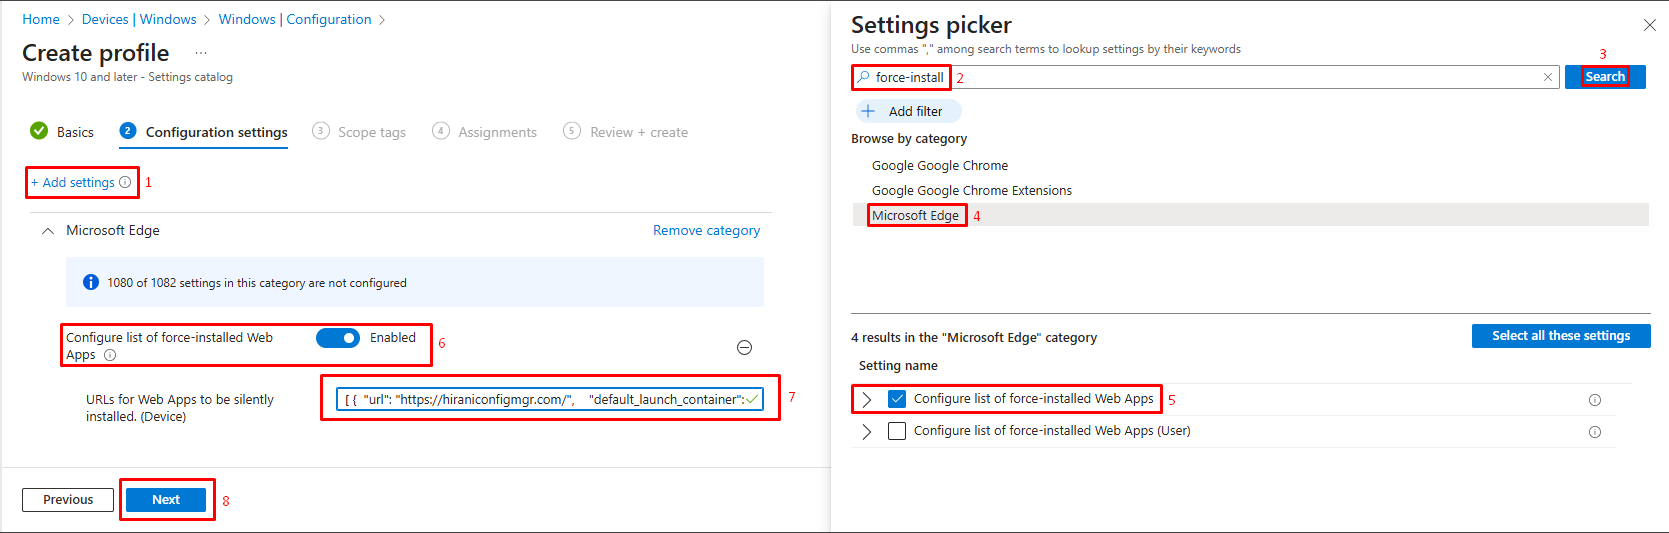
Step 4: Add Microsoft Edge PWA Installation Policy
Now we’ll add the specific Edge policy that controls PWA installation:
- Click + Add settings to open the settings picker
- In the search box, type “
force-installed“ or navigate to Microsoft Edge category - Scroll through the Microsoft Edge settings until you find: “Configure list of force-installed Web Apps”
- Check the box next to this setting to add it to your profile
You’ll see two options appear:
- Configure list of force-installed Web Apps (User) – Applies to users
- Configure list of force-installed Web Apps (Device) – Applies to devices
Choose based on your needs:
- User-level: PWA follows the user across any device they sign into
- Device-level: PWA appears for any user logging into that specific device
For most enterprise scenarios, user-level configuration provides better flexibility, but device-level works well for shared workstations or kiosks.
Step 5: Configure the JSON Policy String
This is where you define exactly what PWA to install and how it should behave. The policy expects a JSON array containing one or more PWA configurations.
Basic JSON Template:
[
    {
        "url": "https://hiraniconfigmgr.com/",
        "default_launch_container": "window",
        "create_desktop_shortcut": true,
        "custom_name": "HiraniConfigMgr Web App",
        "fallback_app_name": "HCMGR"
    }
]
JSON Parameter Explanations:
- url (required): The complete web address of the PWA. This must be the exact URL you want to install.
- default_launch_container (optional): Controls how the PWA opens
- “
window“ – Opens in a standalone window (recommended for app-like experience) - “
tab“ – Opens as a regular browser tab - Default if omitted: Uses the PWA’s manifest preference
- “
- create_desktop_shortcut (optional):
true– Places a shortcut on the user’s desktopfalse– Only creates Start menu entry- Default: false
- custom_name (optional): Overrides the app name in Windows. Useful for clarifying internal vs external versions or adding company branding.
- fallback_app_name (optional): Name used for shortcuts if the PWA’s manifest doesn’t specify a name.
- custom_icon (optional): Provide a URL to a custom icon image to override the PWA’s default icon. Must be an accessible URL.
- Example: “
custom_icon“: { “url“: “https://www.company.com/icons/hcmgr.png“}
- Example: “
Copy your JSON configuration and paste it into the setting field in Intune.
Pro tip: Validate your JSON syntax using a JSON validator (like jsonlint.com) before deploying to avoid syntax errors that could prevent the policy from working.
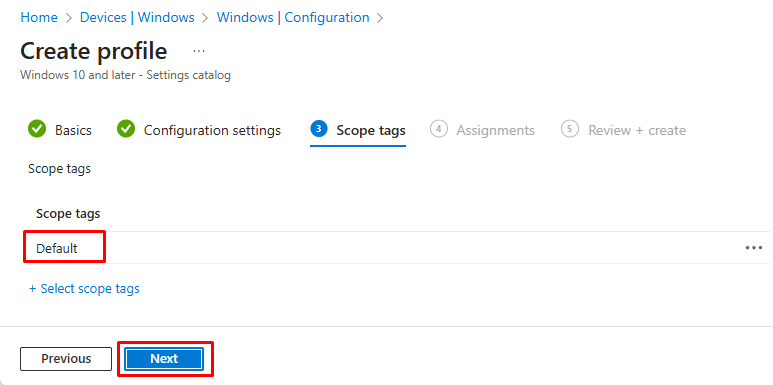
Step 6: Configure Scope Tags (Optional)
If your organization uses role-based access control with scope tags:
- Click Next to reach Scope tags
- Add any relevant scope tags to control which admins can manage this profile
- If not using scope tags, simply click Next
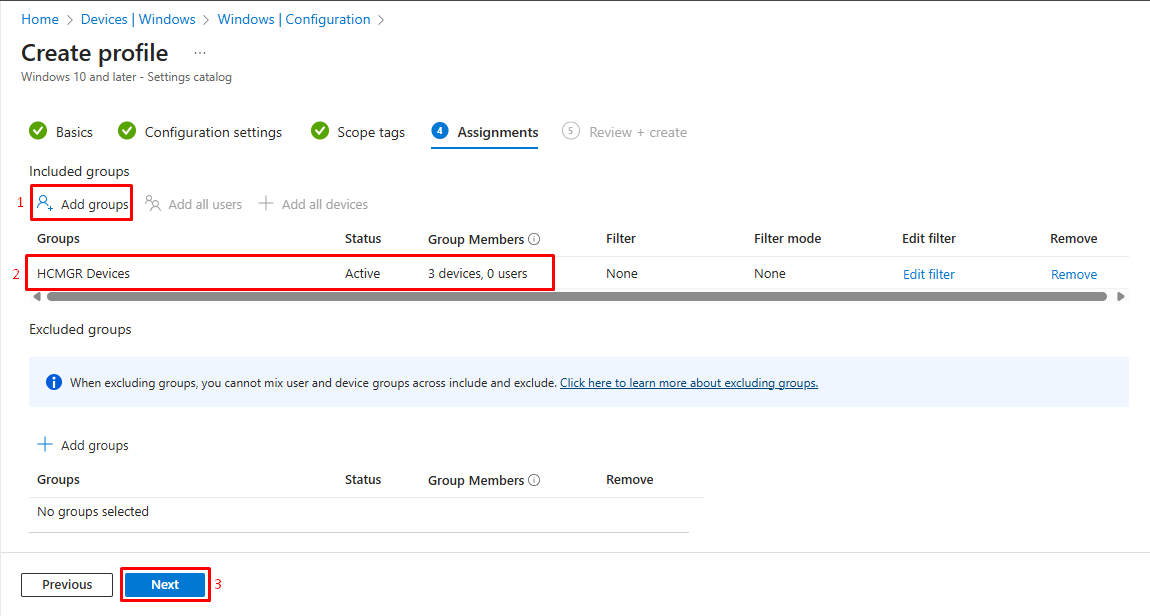
Step 7: Assign to Groups
This determines which users or devices receive the PWA:
- Under Assignments, click + Add groups
- Choose between:
- Add groups – Specific user or device groups that WILL receive this profile
- Add all users – Deploys to everyone in your organization
- Add all devices – Deploys to every enrolled device
- Select your target groups (e.g., “All Staff”, “Finance Department”, “Marketing Team”)
Step 8: Review and Create
- Click Next to reach the Review + create page
- Verify all settings, especially the JSON configuration
- Double-check your group assignments
- Click Create to deploy the profile
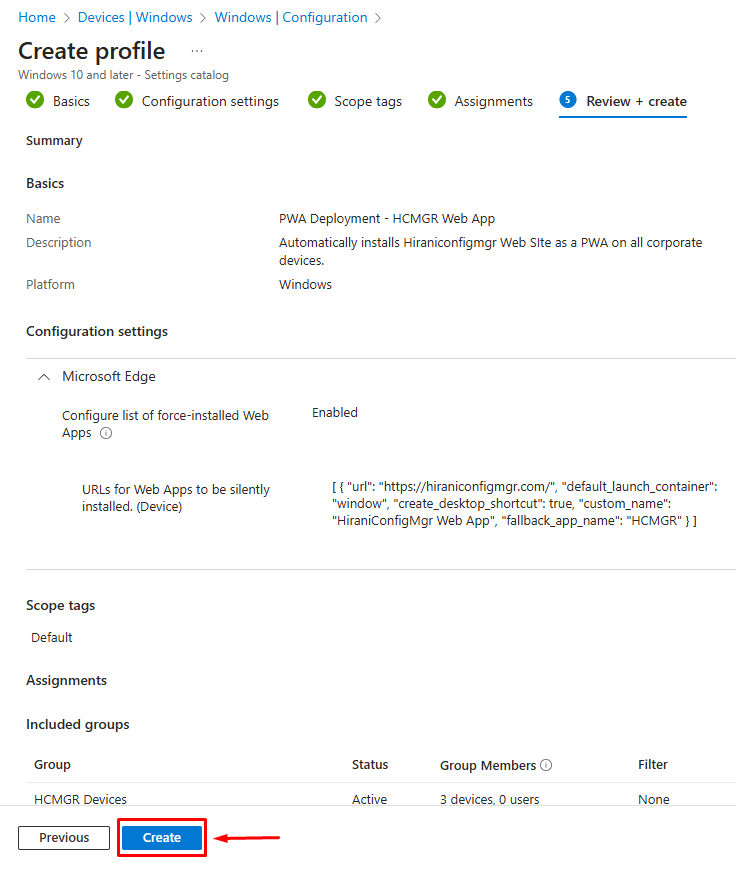
The configuration profile will now begin syncing to assigned devices. Edge will process the policy on next launch or when devices check in with Intune.
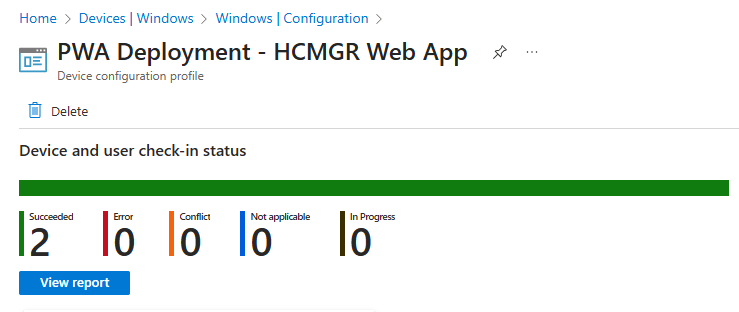
Monitoring and Reporting
Track your PWA deployment success through Intune’s monitoring capabilities:
Device Configuration Status
- In Intune admin center, go to Devices > Configuration
- Click on your PWA configuration profile
- Select Device status to see:
- How many devices successfully applied the policy
- Any devices with errors or conflicts
- Pending deployments
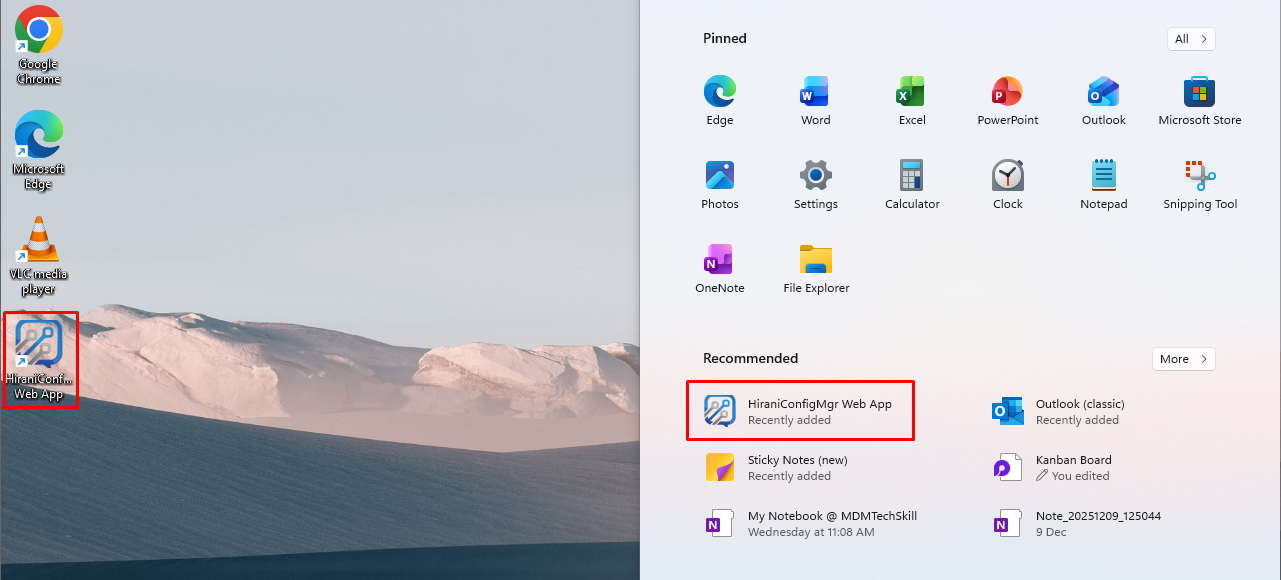
The End-User Experience
Once the policy reaches a device, here’s what your users will see:
Automatic Installation:
- The PWA appears in the Windows Start menu without any user action
- If configured, a desktop shortcut is created
- The app shows up in Windows Settings under “Apps & features”
- Users receive no installation prompts or notifications
Launching the PWA:
- Clicking the shortcut opens the PWA in its own window (if configured)
- The app has its own window icon and title bar
- No address bar or browser UI is visible (clean app experience)
- The app persists in the taskbar like any native application

User Perception: Most users won’t realize they’re using a web-based application. The experience is virtually identical to a native Windows app, which is exactly the goal.
Conclusion
Deploying Progressive Web Apps through Microsoft Intune Configuration Profiles offers a modern, efficient approach to application management. By leveraging Edge’s built-in PWA capabilities, you can deliver app-like experiences to users without the overhead of traditional software deployment.
Ready to deploy your first PWA? Start with a simple, low-risk application and use the JSON templates provided in this guide. Share your experiences and questions in the comments – your insights help the entire IT community learn and improve.


Great article. A couple of questions:
Is there a json property to pin the app to the taskbar?
Is there a way to suppress the first-use ‘App Installed’ prompt with the checkboxes?
Thanks! Glad you found the article useful.
Regarding your questions:
1. Taskbar pinning: unfortunately there’s no JSON property for that in
WebAppInstallForceList. The workaround most admins use is deploying a customLayoutModification.xmlvia Intune as a Win32 app, which lets you control taskbar pins for new user profiles.2. Suppressing the ‘App Installed’ prompt: I’m also not aware of a supported way to suppress the first-use “App Installed” prompt/check boxes when deploying via
WebAppInstallForceList. The install itself is silent, but that first-launch experience can still appear.